Making Faces
February 26, 2022
Back in October 2021 I was working on a project that I needed a lot of Halloween-themed shapes for last-minute. Luckily, Michaels had a few variety packs (but that meant I was at the mercy of the assortment they provided.) Some of the packs I had included what I’ve been referring to as “Cool Skateboarding Werewolves.” These guys weren’t ideal for the project, but I didn’t have the heart to throw them out. They went into a “miscellaneous supplies” drawer, and remained there for a while.

In between projects I would think about the werewolves and what I could to give them another life. Branching out from my “Dozens” series where I created many small 3D sculptures using the same base armature (a plastic egg), I decided to try building up the wooden discs to create a series of goofy faces.

To begin, I used an electric sander to remove the werewolf design and rough up the surface. My goal here was to take off any coating that would act as a resist for my paper clay.


My next steps were to cover the sanded surfaces in paper clay and then start building up the facial features. This stage is always really enjoyable for me because unlike when I’m drawing, where I do a lot of intense planning beforehand, I like to let my sculpted forms develop more organic and intuitively. Working on multiple sculptures simultaneously also challenges me to consider how the surface of each one can be manipulated in order for a sense of variety and uniqueness to emerge. I like to think of this as a form of artistic “play” that helps me loosen up and try new things.


After allowing a few days for the paper clay to dry out, I sanded them to create a smooth surface. To prime the surface I applied a few light coats of gesso and then went to work mixing up the base colors. I selected a base color for each face and applied it with a paintbrush. Next, I airbrushed on a lighter color from the top of the faces to create highlights and a darker color from the bottom to create shadows.
Once these foundation tones were dry I began painting in the details using fine brushes. I wanted them to have a fairly matte appearance so I mainly used acrylic gouache and sealed them with a matte gel medium.

The last step in the process was adding accessories to give each face its own unique bit of flare.
The red face recieved teeth sculpted from polymer clay. This also required the lips to be built out a little more to create the illusion that the teeth were set back in the mouth. To do this I rolled up some gel medium in a piece of wax paper (the way icing was prepared for writing on cakes back in my days of working at a bakery!) and piped it on to add more volume to the lips.
From there I superglued the teeth in place and finished them with painted details.
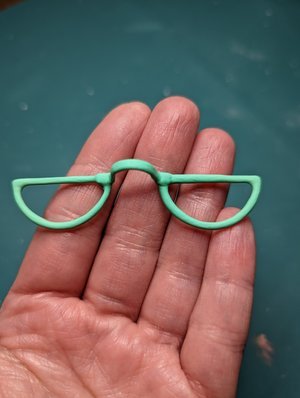

For the blue face I decided to create a pair of glasses by connecting several brass jewelry-making findings with superglue. The glasses were then gessoed and painted with gouache. Once the paint was dry, the lenses were created by filling the frames with UV resin.
I was a little stumped on what to add to the orange face, so I put out a poll on my Instagram. There was an overwhelming response in favor of a nose ring, and I obliged!
To create the nose ring I embarked on a completely new process! It was digitally modeled and then 3D printed. I took this approach in order to get small, precise, symmetrical details. This face reminds me of a sun, so I decided to accentuate it with a nose ring that evokes the kind of triangular rays you see in simple sun icons.
The completed trio!
